Three of my blessings

Three of my blessings

Sunday, July 18, 2010

CDAC Holiday Challenge

Hi bloggers! Here's a card I made for the Holiday/Special Occasion Challenge over at CDAC. It's being hosted by "Sew Many Cards". Angela Doescher has given us this cute little elephant freebie to use in the challenge. He is called "Eris Christmas Lights". Poor little guy. My take on this is that he's having a tough time putting lights on the tree. So my story with this card is that he's got this empty tree that he has to decorate .... all the ornaments are sitting out in a box ready to go, but poor Eris is just getting so frustrated with the tangled lights, as he looks on at this huge task he has to do before Christmas Eve. You can find tons of adorable images like this one here http://shop.somanycards.com/ This is a first for me.... Eris was colored on Photoshop Elements. I took some of the black out of his eyes and made them blue. I printed him out on glossy photopaper. I put a little stickles on his star to bling it up. Along with his tangled lights he's holding a couple ornaments (charms) that I tied to his trunk with SU silver cord. The bling around the circle and the rectangle frame are called "Dot Sparklers" by Stampendous. I got them at Michaels. They're very blingy and yet they are very flat (easier to mail). The ribbon is from PTI. "Joy" is a rubber stamp from S.U.
Close up of Eris....The charms say "Wish" and "Magic"
Another "First".....I needed an empty tree to go with my story for Eris. So I drew this one and the box of "waiting" ornaments. This was also colored on Photoshop. I cut it out and adhered it to my DP with dimensionals. I took the picture outside and the angle of the sun really gives my tree a great shadow! I do have some shading around the tree and box, but it's not that pronounced! My papers are Bazzil cardstock and S.U. Pink Pirouette. I used Cuttlebug embossing folder for the background, and put a little color on the sentiment heart with copics.


Here is my jpeg. If you want to use it, be my guest. I'm not sure if I've done this correctly. I guess you can click on the pic., then right click to save it on your computer.? I'm going to try it myself to see if it works. If it doesn't ... I'll ask somebody who knows. IT WORKS! IT WORKS! I DID IT!!

Friday, July 16, 2010

Michelle Perkett Sketch/color challenge#38

Hi ladies! I guess I'll start with the close-up since that's the order these came up in. This is for Michelle Perkett's Sketch/ color challenge. I've used this adorable image from Michelle called "Abby and Walter's Birthday Wishes". There's a link to Michelle's on my sidebar so you can visit her blog to see all the beautiful inspiration and artwork from Michelle and the fabulous DT. Okay...the whole picture! I cut Abby and Walter apart and resized them and the balloons for placement on the card. Walter is attached with dimensionals as he looks on at Abby's yummy cupcake. I used a big sequin behind the candle and blinged it up a bit with yellow stickles. She's having a "Bright Shiny Birthday"! I doodled two of the balloons with little flowers and polkadots just to change it up a bit. They are attached to SU gold cord which is glued behind Abby and tied to Walter's tail. The ballons themselves are attached with dimensionals. The coloring was done with copics and gel pens.

This is the sketch for the challenge. You could either do just the sketch "or" the colors (Turquoise, cream, sand,chocolate) or combine both. My entry is a combination of both.
DP...PTI.Chocolate Remix, S.U. Sweetpea Designer Series., and DCWV Retro Stack.
cardstock...S.U.
Two little gems...stash.


Wednesday, July 14, 2010

Deedee's Happy Monday Sketch Challenge

This is a card I made for Deedee's "Happy Monday Sketch Challenge" The "sweet" image I used is called "Little Miracles". Deedee's images are all so awesome that I have a really hard time choosing which ones to use. You can go over to her blog to see her wonderful work. Just click on the Deedee's Digis badge on my sidebar.
DP is from Papertrey Ink.....Cardstock is Stampin' Up.......Cuttlebug embossing folder was used on the green panel and I hit the high spots with Palette Clean Canvas. The large flower is handmade with S.U. scalloped circle punch w/half inch circle punch for the center. The sparkle is Dazzling Diamond glitter from S.U. The bling and charms are from my stash. The sentiment is from Designer Digitals. Image was colored with Copics and gel pens.

Sunday, July 11, 2010

Deedee's Flamingo

This is a card I made for the Embellishment Challenge over at CDAC. I used this cute little Flamingo that was a freebie from Deedee's Digis. Please see the link to her adorable artwork on my sidebar. I have named 2 of my Flamingos. "Flossie" is strutting her stuff with a sequin and bling hat. She has a jump ring neclace and ankle bracelet with a bead on each. Her toe ring is a pearl. "Gertie" is puttin' on a show with her purple fiber had with a large sequin that was cut and folded into quarters. She has a long chain necklace with a diamond on it . Her bling ring (which she's showing off to Flossie) and her "Wing Bling" and her toe ring all match in a lovely aqua blue. She also has an ankle bracelet made from a square jump ring with a bead on it. All the blingy things are from my stash of blingy stuff.
The DP is from Paper Trey Ink and the cardstock is from Stampin' Up. The flower is handmade with wet cardstock and DP. I found the sentiment in my collection of fun designs from "Designer Digitals". This is a little on the silly side, but I had a lot of laughs dressing up these two "Girls"! Oh.......I should mention that the two Flamingos in the background are just shaking their heads and giggling when they see Flossie and Gertie. They know how different these two girls are.....but they love Flossie and Gertie anyway!
Thanks for the fun challenge and the Flamingo digi Deedee!

Saturday, July 10, 2010

Magical Birthday

I made this card for "other/theme" challenge at CDAC. The images are all from Michelle Perkett Studios. They are a combination of Goldilocks, Flower Cupcake, and one of the fairy's from "Juniper and Cecelia". The paper is from DCWV glitter stack. The flowers from Joann's and the bling and ribbon is from my stash. I created the sentiment on Photoshop for this. See the close-up below for detail on the fairy.
This little fairy is mounted on a coil of very thin wire so she appears to be floating above the cupcake. She is blowing fairy dust on the cupcake in wishes for a "Magical Birthday". At least that's how it is in my head! I hope it appears that way! Check out Michelle's adorable and whimsical images on PCP and CDAC. There's a link on the sidebar which will take you right to her beautiful artwork.

Wednesday, June 16, 2010

Father's Day Cards with Deedee's Digis

This is the card I would like to enter in Deedee's Sketch Challenge this week. I used her cute set called "Under the Stars" for this. I colored this with Copics. Papers are from S.U. Since I'm a letter carrier, I've been wanting to use this stamp template from Splitcoast Stampers. It's a pdf file. I printed it, then scanned it to Adobe Elements and resized it to my liking for this. Check out Deedee's Digis at http://deedeesdigis.blogspot.com/ to see her adorable images and get some fantastic inspiration.
The inside was generated on Photoshop and papers added to match the front of the card.
I just had to keep using my new Stamp Template and more than one set of Deedee's all on one card, so I continued on. This card and the one below are using Deedee's sets called "Bloom where you're Planted"(frog and planter) and "Little Miracles" (dragonfly) and "Under the Stars" (the sweet bear and the Relax and enjoy sentiment). The Winners Cup and the Sweet little Bee are both freebies that she was so generous to offer. These images were colored with Copics. The round sentiments are old acrylics in my stash of stamps (sorry I can't remember who made these) cause I relocated them to CD folders. The papers are from DCWV and S.U. Oh of course I had to have some bling on the wings of my little bugs and the sand had to sparkle too!


Inside was generated with Photoshop and matching papers added.


And another Stamp template Deedee card! Same images were used as in blue card above. This time I colored them with watercolor pencil. The papers are from S.U. and Basic Grey. The little stars in the corner are made with a corner punch I just got from EK success. Fun Stuff! The ribbon is from Michaels and the screw brads are from my stash. The round sentiment is from my acrylic stamp stash also. I layered it on 3 stars that I punched out and rotated each layer a little.


Inside of card was done with Photoshop, and matching paper added. You can find the Stamp Template on Splitcoast Stampers in the resources section along with a tutorial about it .


Sunday, June 6, 2010

Deedee's Challenge #3 Red-White- & Blue

This is a card I made for Deedee's challenge (Red White and Blue). This is a two pocket card. The coffee cup is from Deedee's digitals http://craftingwithdeedeesdigis.blogspot.com/. The name of the digi set is "Cuppa Love"(Very cute!) The cup was printed twice and colored with water color pencils/gamsol, then layered and shaped to give it a 3D effect. The coffee was done with copic E57 and colorless blender. I used crystal laquer on the coffee to make it look more like liquid (The photo doesn't show this very well). The roses on the cup are actually colored red, (the glitter kind of took the red down a couple tones). The papers used are from SU and DCWV summer stack.
This shows the two things that are in the pockets on the card front. The tag was cut and layered with the same papers from the front of the card. The flower and sentiment on the tag is a rub on from SU. I added glitter to the middle of the flower, and colored the petals with chalk and added red with a #R29 Copic marker. This can be used as a book mark for someone who loves to read. I found an image of the Starbucks card on one of their websites and printed it on Glossy Photo Paper. Too bad it can't be used....but it's the size of a regular gift card. When I give this card away I'll purchase the "Real Thing", or maybe Tim Horton's.

I carried the papers on to the inside of the card. The sentiment is also from Deedee's "Cuppa Love" digi set. There are several other sentiments to choose from in this set. Love the choices!


Thursday, May 27, 2010

Deedee's Digis Challenge #2 Use Scripture of Praise

I made this card for challenge #2 over at http://deedeesdigis.blogspot.com/ This is a joy fold card. The Birdies are from Deedee's Happy Bird-Day digi set. They have been colored with copics. Their eyes have crystal laquer on them and they have a little bit of stickles on their wings. This is a closed view of the card.
This is the opened card. This paper is from S.U. I couldn't resist putting these birds on the inside of the card. The other papers used are S.U. "Bermuda Bay and Crushed Curry". The brown is from my stash of scraps.

This is the card partially open. When it's closed the upper left corner tucks under the white flower at the top which is attached to the card with a dimensional. The ribbon is from P.T.I. Gems are from stash, and musical notes are rub-ons I've had forever from QVC. The Scripture is a verse I chose and printed on Photoshop. The paper it's printed on was also created on photoshop. I don't know if you can tell from the photo, but the paper has lyres of different sizes on it in a very faint grey. Thanks for taking a peek!


Sunday, May 23, 2010

Squigglefly Shy Bear Graduate

Okay...Here's the horizontal version of my G card. The image is "Shy Bear" from Squigglefly at http://www.squigglefly.com/ . I think this is good for a 5 year old boy. "He's not too Fluffy and Girly Girl". I printed him out 3 times and layered him to look like he's hiding behind the star. He's colored with copics and wc pencils/gamsol. His eyes and nose have Crystal Laquer on them to make them shine! I added Burke's name and the year to the "diploma". The sentiment is self done on Photoshop, but the circle is from Birds Cards (see Sat. post for address).
The purple paper is from stash (embossed with CB and sanded lightly). Printed paper is from DCWV glitter stack I added blingy gems to it. The shiny yellow star is called "Pearl Paper" that I got from a scrap convention a few years ago. Don't know manufacturer. I ran it through the CB swiss dot along with the white torn paper in the corner of the card. I ran a small purple ink cube along the dots on the white paper. Hope you like it!
Thank you for all of the nice comments! I feel honored that you take the time, considering all of the gorgeous creativity I've seen from all of you !

A couple images from Bird's Cards

I made this card for my nephew's upcoming Graduation. Glad I'm a little ahead of the game! I made a template for the card on PS. The G is part of the card front. I printed out some grad words in PS and printed it on the Kraft paper. The blue/green paper and the white base of the card is from P.T.I. There is a strip of the P.T.I. paper inside the card also.
The Grad cap and the circle are freebies from www.http.//birdscards.com . She has lots of freebies that are very useful! The sentiment inside the circle was generated on PS. The coloring of the cap was done with copics and wc pencils/gamsol. Below is how the card shape was made if you'd like to know.

This (above) was printed (borderless) on 8.5X11 in. paper. It makes two (A2) size cards. When the paper is cut in half, you'll have one vertical and one horizontal card with the G on the edge of the card front. Cut out the right side of the G and the center of the G. Leave the left side attached. Use the white part of the G as a template for cutting out your contrasting paper or you could just color the inside of the G as you wish.


This is the print I made on PS. to print onto the kraft paper for my card. I think you can click and save it as a jpeg in a folder on your computer if you wish to use it. You may even be able to do the same thing with the card template. (Not sure)? Any way hope you like it.


Thursday, May 20, 2010

Crafting with Deedee's Digis challenge #1

This card was made for Deedee's Digis 1st challenge. (Use white as an accent color.) I decided to do a flower pot card. (Tutorial at SCS) I used the floral part of one of Deedee's images called "Cup of Joy". The sentiment on the front of the card was done on Photoshop. The card base is from S.U. cardstock "Pumpkin Pie" and sponged with brown. The bottom of the pot is covered with Basic Grey "Sublime" paper. This first image is what the card looks like when it's closed.
This is a pic. of the card partially opened. The flowers are adhered to the inside card with dimensionals so when the card is closed (or pushed down) they will over-lap the top of the pot. The sentiment on the inside is also from "Cup of Joy". This cute set comes with 4 sentiments to choose from....also the flowers are in a cup "very cute"! The frame around the sentiment was done with Photoshop.

This is the card all the way out. The flowers were colored with Copics and the centers were dotted with a Sharpie marker with Stickles on top. The ribbon and brads are from my stash. Check out Deedee's Digis at http://deedeesdigis.blogspot.com/ . Her store is VERY newly opened. I think you'll like what you see there.


Thursday, May 13, 2010

Beautiful Blogger Award!!

I just received this "Beautiful Blogger Award" from Barbara over at Barbara's world of Whimcees! Thank you Barbara! I wish you lived next door to me...so we could visit and craft and talk! I have just recently discovered her blog and have viewed it with AWE at her many talents! Her creativity is a sight to behold! The award is on my sidebar to the right. If you would like a "treat for your eyes"... just click on the award to get to her blog. I promise you'll love what you see! Plan to spend some time looking....there's so much beautiful talent!

Wednesday, May 12, 2010

Mo's Challenge #30

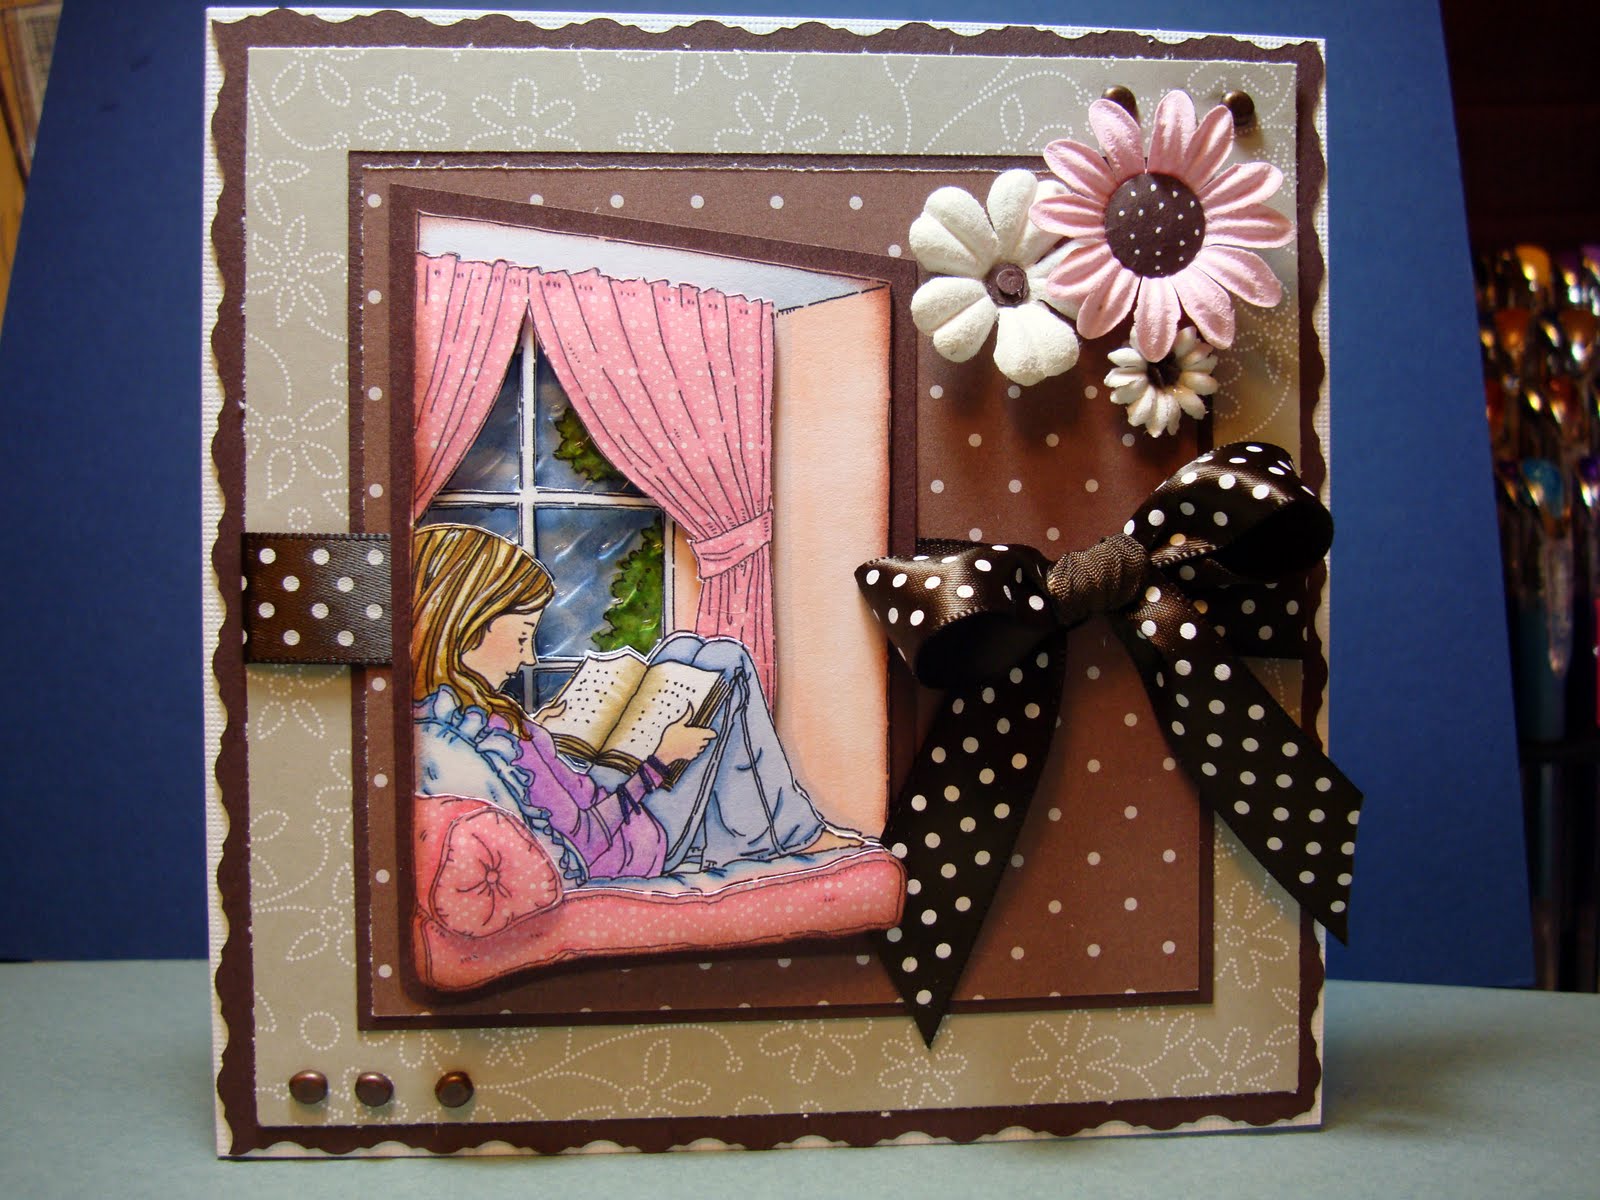
I made this card for Mo's challenge #30. "Include rain or suggest water" in the project. The image is from Mo's digital pencil http://digitalpenciltoo.com and is called "Windowseat". Papers are all from S.U. designer paper and Choc.Chip cardstock. Ribbon is from P.T.I. Brads flowers and acetate are from stash.
This is a close up of the detail. I put drops of crystal laquer on the back side of the acetate to look like rain before I attached it to the window frame. The sky was sponged, and the little girl was colored with copics and water color pencils. The curtains and bedding were paper-pieced from S.U. DP. She looks so cozy as she cuddles up in her windowseat on a dark rainy day.

Tuesday, May 11, 2010

Shirleys 2 Girls Challenge #55

This is the card I made for Shirleys 2 Girls challenge #55. The challenge was to use the word "Welcome" in the project. The image is called "Pamper" from http://shirleys2girls.com/. Oh she looks like she's enjoying this so much! This was colored with wc pencils and Copics. She has stickles on her jewelry and Crystal Laquer in the water and the wine glass, and bubbles.
The background blingy paper is from DCWV The Glitter Stack. The rest of the papers are pink and peachy colors from my stash. The flowers were punched.. wet.. crunched.. and put together with stash brads. Leaves were cut by hand ..wet and crunched. The little flowers and gems are from the old stash. The sentiment was done on Photoshop.

Monday, May 10, 2010

Pixie Dust Challenge #21 Use Kraft in your project

I made this Father's Day card for my Grandson to give to his Daddy. The challenge was to use Kraft in your project. The image is called "Buddies" from Pixie Dust. I used a CB folder on the Kraft paper to add a little dimension. The image was colored with water color pencils and Copic Markers. The little boy is cut out and colored separately and dimensions were added to lift him out from the flat picture. I used a bristle brush and pounced some yellow and brown ink on the background of the image and on the sentiment background. Buttons are from S.U. The sentiment comes with the Buddies image when you order it. (a happy surprise!) The colored papers are from S.U. (Handsome Hunter and Real Red) not sure about the yellow (scrap). I did a little bit of doodling around some of the edges.

Stretch N Bubbles Sketch Challenge #5

I love this image from Stretch N Bubbles. Her name is Sabrina Bird. She looks like she has a really good sense of humor and is kind of whacky too! She doesn't care what other people think..."Girls Just Want to Have Fun"! (That's her motto)
I colored her with water color pencils and copics. Added Crystal Laquer to her eyes and inner tube for a little shine. The sand is Heat & stick Powder w/Dazzling Diamond Glitter on a torn piece of paper that looks like sand. The papers are S.U. I used 2 CB folders to emboss the Very Vanilla paper. The sentiment was done on Photoshop,(FONT IS LMS HIPPY CHICK), then colored the flowers with my gel pens from Costco. All the flowers are from Prima. The large ones were cut down to fit in the corner and along the scallopped oval which was cut with Spellbinders.

Wednesday, May 5, 2010

Pollycraft challenge #42 Summer card


I'm entering this card in the Pollycraft Challenge #42. "Summer" http://pollycraftchallengeblog.blogspot.com/ The image used is the cute little bee from Stretch and Bubbles http://snbshop.blogspot.com/.

I ran across this style card on a blog (can't remember where) but I thought it was different, so I changed it up for my own design. I printed BEE YOU on photoshop and scored, cut, folded and colored the letters and the bee. Sentiment is also created on Photoshop.


Papers are from Stampin Up. The fence is cut with the Word Window Punch from S.U. and pieced together. Little flowers are from the "stash". I put black seed beads in the center of the small flowers and sprinkled some diamond dust glitter on them. The large flower is a punch of a flower that I folded to fit the corner. Leaves are cut by eye. 1/2" circle in center of flower.


The bee's antenna are done with wire and a bead that was dipped in glitter afterward. Gems are from stash. Black cs was used as the main base of the card. I had fun doing each little panel.


Monday, May 3, 2010

Mo's Challenge #29 Masculine

This is the first challenge I've done with Mo's Digital Pencil. The challenge is for a masculine card. This is a "little boy" type masculine card. Hope that's okay. My grandson needs a card to give mommy for Mother's Day,and this "Super Duper Boy" image is perfect for him.
I love Mo's images! She really captures the expressions and temperments of the characters that she draws. I did the coloring with Copics and water color pencils for his skin. The red and blue papers are all Stampin Up. The white paper w/polkadots was done by me, along with the doodling around the image. The sentiment was written out with a marker and attached to a paper-covered chipboard shape.

Michelle Perkett Challenge #27 (Either or)

It's a good thing this is "Either Or"! I started out with the sketch that was given to us by Nancy, and ended up kind of doing the sketch, but missing a few parts! So many times I've started out with a vision and ended up with a surprise. This is one of those times!
I couldn't pick a favorite image if I tried because I love them all.....but I've had "Pearl" for a while and really loved coloring her! She was done with water color pencils. I added lots of gems to her hair and clothing. The papers used were from my scrap stash and I used CB embossing folders for the white and the blue paper.

Sunday, May 2, 2010

POLLYCRAFT CHALLENGE #41 MAKE YOUR OWN FLOWERS

This is the card I made for Pollycraft challenge #41 (Make your own flowers). The image is of Fluffy from Pollycraft. He looks a little mischievious and so he has picked some of the flowers he sees and is hiding them behind his back. I love this cute little monster!
I saw a tutorial for this type of stair step card on http://juliedavison.com/ . She has directions that you can print out for your own use.

I colored Fluffy with Copic markers and put some crystal laquer on his eyes to make them shine. The flowers were punched out with a Stampin up punch and cupped. I glued the flowers to wire and inserted them into the grass with glue dots. The grass is made with my blade runner and glass mat. Paper for grass is from P.T.I. blue and green print stack, and the ribbon is also P.T.I. "New Leaf". The sentiment was created by myself on my Photoshop program.
This was a fun project!! I will be doing more of these when I have extra time for crafting, because they do take a little longer to make than a regular card.


Karens Doodles Challenge #8 Mom/Feminine

The name of this sweet little image is "Love at first Sight" from Karen's Doodles. She was colored with water color pencils w/gamsol, and copics were also used. I added some little dots and x's on the bunny's body and a little heart on the cheek. I doodled around the edge of the image and on the printed paper. I added a little bit of S.U. dazzling diamond glitter to her skirt.
The flower was done with a flower punch. The leaves are cut from S.U. small oval punch and pinked along the edge, wet... then crumpled. Button is from stash. Sentiment w/frame was created on my Photoshop program. CB embossing folder was used on the light pink background and on the horizontal strip of orange.

This is the sentiment I created in Photoshop. I added a little bit of doodling around the edge. All paper used was Stampin Up.....Pumpkin Pie...Pink pirouette...Regal Rose...and from the print pack. Scallopped edges were done with S.U. punch.